What’s new in linuxmuster-linbo 2.3
- Kernel 4.9.x with current hardware drivers.
- Native support of 64bit hardware at LINBO-runtime
- Automatic recognition of 32bit PAE, 32bit non-PAE and 64bit hardware
- New Partition Mechanism
- Change of local and PXE boot system to Grub 2.
- Simplified boot configuration in just one Grub configuration file for local and networkboot
- Pre-configured grub boot menus can be easily activated and customized
- Automatic reboot before each start of operating system minimizes hardware problems
- Automatic Linbo- or Grub-update on locally booted clients with automatic reboot.
- Support for grub themes
- Support for UEFI boot clients
- Partitioning in GPT mode on EFI systems
- The start.conf files are given a new option SystemType, which can be assigned the values *biosbios64|efi32|efi64*. The default value bios is entered, which works for all clients with a conventional BIOS boot.
- Support of multiboot systems with UEFI
- Automatic creation and simplified download of boot media images for USB storage or direct CD/DVD burning
- Support for setting System time by a time server
- Unit specification for partition variables in the start.conf file (M for megabytes, G for gigabytes, T for terabytes)
Repair and recreate an image after partitioning
As of version 2.3.0, another partition program is used to create valid partition tables for UEFI and BIOS. For re-partitioning, Windows requires a system boot repair and then re-creating an image. Read :ref: here <howtos-upgrade-image-label> how it works.
Boot configuration with grub
linuxmuster-linbo Version 2.3.0 uses Grub as bootloader for networkboot and local boot.
Important
The previous PXE-bootconfiguration under “/var/linbo/pxelinux.cfg” is obsolete with that.
Kernel options are taken over from start.conf. Therefore there is a new option KernelOptions, where you can add kernel parameters separated by whitespace (no whitespaces within a parameter):
KernelOptions = quiet splash dhcpretry=10 acpi=noirq
Specific PXE-boot-settings for a certain hardware class are now conducted in the boot-config files that are created under the filename of the corresponding hardware class with extension .cfg in the directory “/var/linbo/boot/grub”. In this file, adjustments for special reasons can be made.
At the start via Grub, the configuration file, which is stored locally under /cache/boot/grub/grub.cfg or on the server under /var/linbo/boot/grub/grub.cfg is loaded. This file causes the Grub bootloader to read out a possible local cache stored grub configuration. If a Grub environment variable reboot_grub was previously loaded with a partition information by a operating system startup initiated by Linbo, Grub starts the operating system installed on this partition. If the variable is not set, the group-specific configuration file is loaded, which contains specific menu entries for the relevant computer group.
Group-specific boot configuration
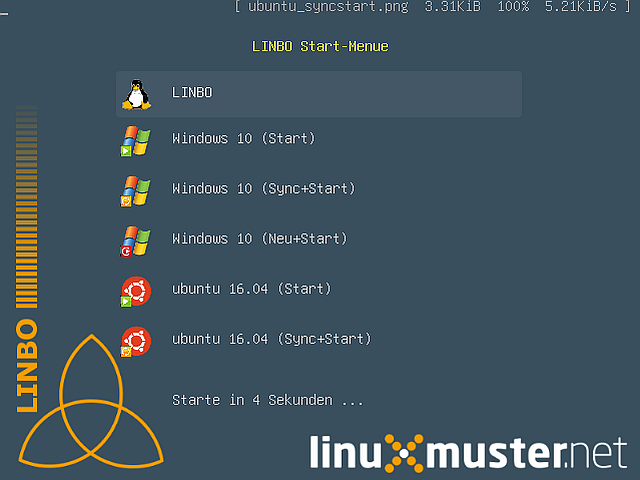
The group-specific boot-configuration-file is created automatically at workstation import (see chapter :doc:’../clients/windows10clients/registration’) from the start-conf file of the group. It contains a menu entry for Linbo and three more for every operating system defined in start.conf. By default, the menu is hidden and configured in a way, that Linbo will be booted automatically.
To activate the boot menu, you have to set the
/var/linbo/boot/grub/win10.cfgto the Timeout-value in the file/var/linbo/boot/grub/win10.cfg. Use the value for `gfxpayload <www.gnu.org/software/grub/manual/grub.html#gfxpayload`__ to adjust resolution and color depth. Alternative Grub Themes can be configured via `theme <http://www.gnu.org/software/grub/manual/grub.html#theme`__ variable (set theme=). These must be placed in a directory under/var/linbo/boot/grub/themes.The boot menu entries usually do not have to be adjusted. Depending on your own requirements, it may be necessary to change the order or the text of the menu items or to remove individual entries (for example, for the unsynchronized start). In the last case, simply delete the complete line range from menuentry to the closing brace.
Under set-Default the entries 0 - 6 mean the following:
set default = x;
For x:;
0 = linbo;
1 = first operating system unsynchronized;
2 = first operating system synced;
3 = first operating system new+sync;
4 = Second operating system unsynchronized;
5 = Second operating system sycned;
6 = second operating system new+sync;
Important
If you add your own customizations to the file, you should change the line ##### managed by linuxmuster. net #### in #### not managed by linuxmuster. net ### to avoid overwriting the changes during workstation import.
Here is an example of a system with Windows 10, first of all the global part:
 # global part of group specific grub.cfg template for linbo net boot
 # thomas@linuxmuster.net
 # 12.02.2016
 #

 # if you don't want this file being overwritten by import_workstations remove the following line:
 # ### managed by linuxmuster.net ###

 # edit to your needs
   set default=0
   set timeout=10
   set fallback=1

  set gfxpayload=800x600x16

 # 32bit pae, non pae or 64bit kernel
  if cpuid -l; then
   set linbo_kernel=/linbo64
   set linbo_initrd=/linbofs64.lz
  elif cpuid -p; then
   set linbo_kernel=/linbo
   set linbo_initrd=/linbofs.lz
  else
   set linbo_kernel=/linbo-np
   set linbo_initrd=/linbofs-np.lz
  fi

# theme settings (modify for custom theme)
  set theme=/boot/grub/themes/linbo/theme.txt
  set font=/boot/grub/themes/linbo/unifont-regular-16.pf2

# load theme
# if [ -e "$theme" -a -e "$font" ]; then
#     loadfont "$font"
   export theme
# fi

   clear
The global part is followed by the menu entries for LINBO and the operating systems (one each for Start, Sync and New).
The first menu entry (No. 0) starts LINBO, if possible from the local cache, otherwise via network:
 # linbo part, boot local or net (default #0)
    menuentry 'LINBO' --class linux {

    echo LINBO $bootflag for group win10
    echo

    set root="(hd0,6)"
   if [ -e "$linbo_kernel" -a -e "$linbo_initrd" ]; then
    set bootflag=localboot
   elif [ -n "$pxe_default_server" ]; then
    set root="(tftp)"
    set bootflag=netboot
   fi

   if [ -n "$bootflag" ]; then
    echo -n "Loading $linbo_kernel ..."
    linux $linbo_kernel splash quiet $bootflag
    echo
    echo -n "Loading $linbo_initrd ..."
    initrd $linbo_initrd
    boot
   else
   if [ "$grub_platform" = "pc" ]; then
     set ipxe="/ipxe.lkrn"
   fi
   if [ -e "$ipxe" ]; then
      echo -n "Initiating pxe boot ..."
      linux16 $ipxe dhcp
      boot
   fi
 fi
}
This is followed by the entry (No. 1) for the unsynchronized start of the operating system:
# group specific grub.cfg template for linbo net boot, should work with linux and windows operating systems
# thomas@linuxmuster.net
# 20160804
#
# start "Windows 10" directly
  menuentry 'Windows 10 (Start)' --class win_start {

  set root="(hd0,1)"
  set win_efiloader="/EFI/Microsoft/Boot/bootmgfw.efi"

  if [ -e /vmlinuz -a -e /initrd.img ]; then
     linux /vmlinuz root=/dev/sda1
     initrd /initrd.img
  elif [ -e /vmlinuz -a -e /initrd ]; then
     linux /vmlinuz root=/dev/sda1
     initrd /initrd
  elif [ -e /grub.exe -a -e /noinitrd_placeholder ]; then
     linux /grub.exe root=/dev/sda1
     initrd /noinitrd_placeholder
  elif [ -e /grub.exe ]; then
     linux /grub.exe root=/dev/sda1
     elif [ -s /boot/grub/grub.cfg ] ; then
     configfile /boot/grub/grub.cfg
  elif [ "$grub_platform" = "pc" ]; then
     if [ -s /bootmgr ] ; then
        ntldr /bootmgr
     elif [ -s /ntldr ] ; then
        ntldr /ntldr
     elif [ -s /grldr ] ; then
        ntldr /grldr
     else
        chainloader +1
     fi
   elif [ -e "$win_efiloader" ]; then
      chainloader $win_efiloader
      boot
   fi
  }
The next menu entry (No. 2) enables the synchronized start of the operating system:
# boot LINBO, sync and then start "Windows 10"
menuentry 'Windows 10 (Sync+Start)' --class win_syncstart {

   set root="(hd0,6)"

   if [ -e "$linbo_kernel" -a -e "$linbo_initrd" ]; then
      set bootflag=localboot
   elif [ -n "$pxe_default_server" ]; then
      set root="(tftp)"
      set bootflag=netboot
   fi

   if [ -n "$bootflag" ]; then
      echo LINBO $bootflag for group win10
      echo
      echo -n "Loading $linbo_kernel ..."
      linux $linbo_kernel splash quiet linbocmd=sync:1,start:1 $bootflag
      echo
      echo -n "Loading $linbo_initrd ..."
      initrd $linbo_initrd
      boot
   fi
  }
Finally, the menu entry (No. 3) for New Start follows:
# boot LINBO, format os partition, sync and then start "Windows 10"
menuentry 'Windows 10 (Neu+Start)' --class win_newstart {

   set root="(hd0,6)"

   if [ -e "$linbo_kernel" -a -e "$linbo_initrd" ]; then
      set bootflag=localboot
   elif [ -n "$pxe_default_server" ]; then
      set root="(tftp)"
      set bootflag=netboot
   fi

   if [ -n "$bootflag" ]; then
      echo LINBO $bootflag for group win10
      echo
      echo -n "Loading $linbo_kernel ..."
      linux $linbo_kernel splash quiet linbocmd=format:1,sync:1,start:1 $bootflag
      echo
      echo -n "Loading $linbo_initrd ..."
      initrd $linbo_initrd
      boot
   fi
  }
Now the entries for the Ubuntu boot
 # group specific grub.cfg template for linbo net boot, should work with linux and windows operating systems
 # thomas@linuxmuster.net
 # 20160804
 #

 # start "ubuntu 16.04" directly
   menuentry 'ubuntu 16.04 (Start)' --class ubuntu_start {

   set root="(hd0,2)"
   set win_efiloader="/EFI/Microsoft/Boot/bootmgfw.efi"

 if [ -e /vmlinuz -a -e /initrd.img ]; then
   linux /vmlinuz root=/dev/sda2 ro splash
   initrd /initrd.img
 elif [ -e /vmlinuz -a -e /initrd ]; then
   linux /vmlinuz root=/dev/sda2 ro splash
   initrd /initrd
 elif [ -e /vmlinuz -a -e /initrd.img ]; then
   linux /vmlinuz root=/dev/sda2 ro splash
   initrd /initrd.img
 elif [ -e /vmlinuz ]; then
   linux /vmlinuz root=/dev/sda2 ro splash
 elif [ -s /boot/grub/grub.cfg ] ; then
   configfile /boot/grub/grub.cfg
 elif [ "$grub_platform" = "pc" ]; then
   if [ -s /bootmgr ] ; then
   ntldr /bootmgr
 elif [ -s /ntldr ] ; then
   ntldr /ntldr
 elif [ -s /grldr ] ; then
   ntldr /grldr
 else
   chainloader +1
 fi
  elif [ -e "$win_efiloader" ]; then
  chainloader $win_efiloader
  boot
 fi
}
# boot LINBO, sync and then start "ubuntu 16.04"
  menuentry 'ubuntu 16.04 (Sync+Start)' --class ubuntu_syncstart {

  set root="(hd0,6)"

  if [ -e "$linbo_kernel" -a -e "$linbo_initrd" ]; then
   set bootflag=localboot
  elif [ -n "$pxe_default_server" ]; then
   set root="(tftp)"
   set bootflag=netboot
  fi

  if [ -n "$bootflag" ]; then
   echo LINBO $bootflag for group win10
   echo
   echo -n "Loading $linbo_kernel ..."
   linux $linbo_kernel  linbocmd=sync:2,start:2 $bootflag
   echo
   echo -n "Loading $linbo_initrd ..."
   initrd $linbo_initrd
   boot
  fi
 }
# boot LINBO, format os partition, sync and then start "ubuntu 16.04"
  menuentry 'ubuntu 16.04 (Neu+Start)' --class ubuntu_newstart {

  set root="(hd0,6)"

  if [ -e "$linbo_kernel" -a -e "$linbo_initrd" ]; then
   set bootflag=localboot
  elif [ -n "$pxe_default_server" ]; then
   set root="(tftp)"
   set bootflag=netboot
  fi

  if [ -n "$bootflag" ]; then
   echo LINBO $bootflag for group win10
   echo
   echo -n "Loading $linbo_kernel ..."
   linux $linbo_kernel  linbocmd=format:2,sync:2,start:2 $bootflag
   echo
   echo -n "Loading $linbo_initrd ..."
   initrd $linbo_initrd
   boot
  fi
 }
Tip
The group-specific boot configuration can also be adapted via the school console.
If the Grub boot menu has been activated, it will be displayed the next time the client is started like this:
Linux clients with UEFI boot
To install a Linux distribution on UEFI systems, an EFI partition (200 MB) is to be provided in the start.conf file. In addition, the option SystemType must be set to efi64. This allows the client hard disk to be partitioned according to the GPT-Scheme. A sample file is located on the server under /var/linbo/examples/start.conf.ubuntu-efi.
The procedure is not different from the BIOS system: after you have partitioned the client hard disk with Linbo, you boot the installation media (of course in the UEFI mode) and installed according to the instructions.
Alternatively, the Cloop-Image of an installation of a BIOS-Computer can be imported on a UEFI-computer ((Has worked with Ubuntu 14.04 easily and should work with other Linux)). Once you have booted the UEFI machine, you simply create a new image and distribute it to the rest of your computer. The image can be used for BIOS and UEFI computers as well.
Windows clients with UEFI boot
For Windows on UEFI systems, a Microsoft reserved partition (msr)) (128 MB) must also be provided in addition to the EFI partition so that the operating system is installed in the third partition. A corresponding start.conf example is located under /var/linbo/examples/start.conf.win10-efi on the server. The procedure is as usual: first partitioning with Linbo, then installation.
Also with Windows, it is possible to use an image created on a BIOS computer on the UEFI machine. Initially, the operating system will not start, but the chances are good, that it will work after a start-up repair with the installation media. If you are lucky and Windows is finally booting, you can use the image created on the UEFI computer also on BIOS systems.
How to install Windows with UEFI
Create the start.conf file
In the first step, create an EFI-compatible start. conf file for a new group of computers win10-efi under /var/linbo for the computer group win10-efi. Simply copy the sample file start. conf. win10-efi to /var/linbo (as root user on the server):
# cp /var/linbo/examples/start.conf.win10-efi /var/linbo/start.conf.win10-efi
If your computer group is named differently, adjust the name of the target file accordingly.
Customize the partition sizes in the start.conf file to suit your needs. You can specify units for the quantities (M for megabytes, G for gigabytes, T for terabytes):
# LINBO start.conf Beispiel mit EFI (GPT)
# EFI 64 Partition 1
# MSR  Partition 2
# Windows 10  Partition 3
# Cache auf Partition 4
# Daten auf Partition 5
# Festplatte 160G

[LINBO]                  # globale Konfiguration
Server = 10.16.1.1       # IP des Linbo-Servers, der das Linbo-Repository vorhaelt
Group = win10-efi           # Name der Rechnergruppe fuer die diese Konfigurationsdatei gilt
# Achtung: Server und Group werden beim Workstationsimport automatisch gesetzt!
Cache = /dev/sda4        # lokale Cache Partition
RootTimeout = 600        # automatischer Rootlogout nach 600 Sek.
AutoPartition = no       # automatische Partitionsreparatur beim LINBO-Start
AutoFormat = no          # kein automatisches Formatieren aller Partitionen beim LINBO-Start
AutoInitCache = no       # kein automatisches Befuellen des Caches beim LINBO-Start
DownloadType = torrent   # Image-Download per torrent|multicast|rsync, default ist rsync
BackgroundFontColor = white         # Bildschirmschriftfarbe (default: white)
ConsoleFontColorStdout = lightgreen # Konsolenschriftfarbe (default: white)
ConsoleFontColorStderr = orange     # Konsolenschriftfarbe fuer Fehler-/Warnmeldungen (default: red)
SystemType = efi64                  # moeglich ist bios|bios64|efi32|efi64 (Standard: bios fuer bios 32bit)
KernelOptions = quiet splash        # Beispiele:
#KernelOptions = acpi=noirq irqpoll # LINBO Kerneloptionen (z. B. acpi=off), m. Leerz. getrennt
#KernelOptions = server=10.16.1.5   # Abweichende Linbo-Server-IP als Kerneloption gesetzt
                                    # falls gesetzt wird diese IP beim Workstationsimport verwendet

[Partition]              # Partition fuer EFI
Dev = /dev/sda1          # Device-Name der Partition (sda1 = erste Partition auf erster Platte)
Label = efi              # Partitionslabel efi (efi system partition)
Size = 200M              # Partitionsgroesse 200M, ist keine Einheit (M, G oder T) angegeben, wird kiB angenommen
Id = ef                  # Partitionstyp (83 = Linux, 82 = swap, c = FAT32, 7 = NTFS, ef = efi)
FSType = vfat            # Dateisystem auf der Partition (FAT32)
Bootable = yes           # Bootable-Flag gesetzt

[Partition]              # Partition fuer MSR
Dev = /dev/sda2          # Device-Name der Partition (sda2 = zweite Partition auf erster Platte)
Label = msr              # Partitionslabel msr (microsoft reserved partition)
Size = 128M              # Partitionsgroesse 128M
Id = 0c01                # Partitionstyp 0c01
FSType =                 # kein Dateisystem
Bootable = no            # kein Bootable-Flag

[Partition]              # Partition fuer Windows
Dev = /dev/sda3          # Device-Name der Partition (sda3 = dritte Partition auf erster Platte)
Label = win10             # Partitionslabel win10
Size = 50G               # Partitionsgroesse 50G
Id = 7                   # Partitionstyp 83
FSType = ntfs            # Dateisystem ext4
Bootable = no            # kein Bootable-Flag

[Partition]              # Cache-Partition
Dev = /dev/sda4          # Device-Name der Partition (sda4 = vierte Partition auf erster Platte)
Label = cache            # Partitionslabel cache
Size = 50G               # Partitionsgroesse 50G
Id = 83                  # Partitionstyp 83
FSType = ext4            # Dateisystem ext4
Bootable = no            # kein Bootable-Flag

[Partition]              # Daten-Partition
Dev = /dev/sda5          # Device-Name der Partition (sda5 = sechste Partition auf erster IDE-Platte)
Label = daten            # Partitionslabel daten
Size =                   # Partitionsgroesse nicht angegeben = Rest der Platte
Id = 7                   # Partitionstyp 7
FSType = ntfs            # Dateisystem ntfs
Bootable = no            # kein Bootable-Flag

[OS]                         # Beginn einer Betriebssystemdefinition
Name = Windows 10             # Name des Betriebssystems
Version =                    # Version (unbenutzt, leer lassen)
Description = Windows 10 SP1  # Beschreibung
IconName = win10.png         # Icon für den Startbutton, muss unter /var/linbo/icons abgelegt sein
Image =                      # differentielles Image (Erweiterung .rsync, Verwendung nicht empfohlen)
BaseImage = win10.cloop       # Dateiname des Basisimages (Erweiterung .cloop)
Boot = /dev/sda3             # Bootpartition (unbenutzt, immer gleich Rootpartition)
Root = /dev/sda3             # Rootpartition, in die das BS installiert ist
Kernel = auto                # Windows: auto (LINBO & Grub erkennen die Startparameter automatisch)
Initrd =                     # Windows: leer
Append =                     # Windows: leer
StartEnabled = yes           # "Start"-Button anzeigen
SyncEnabled = yes            # "Sync+Start"-Button anzeigen
NewEnabled = yes             # "Neu+Start"-Button anzeigen
Autostart = no               # automatischer Start des Betriebssystems (yes|no)
AutostartTimeout = 5         # Timeout in Sekunden für Benutzerabbruch bei Autostart
DefaultAction = sync         # Standardaktion bei Autostart: start|sync|new
Hidden = yes                 # verstecke OS-Reiter (unbenutzte Option, auf "yes" lassen)
If you do not need a data partition, simply delete the definition for the fifth partition. You can also add more partitions (up to a total of 128).
Note that for EFI operation as the first and second partition, an EFI and MSR partition must be defined. So you should not change these partitions.
If the start.conf file has been created, you should add the computer to the win10-efi group via the workstation import.
Setup Client
If you have not already done, activate the UEFI network boot in the computer firmware of the prepared computer. The BIOS settings are often differentiated between Legacy and UEFI booting. If necessary, you must access the computer manual to find the appropriate setting.
Before booting the computer with the changed setting, first start partitioning via linbo-remote on the server. Assuming the computer is called r100-pc01, prepare the following command on the server:
# linbo-remote -i r100-pc01 -p format,halt
Alternatively, you can create a corresponding task in the school console as user administrator under LINBO|remote control.
Then, after switching on the prepared computer, LINBO will repartition the hard disk according to the partition scheme defined in the start.conf file and then shut it down again.
Now install Windows 10 using the installation media as usual. At the beginning of the installation, select the correct partition for the installation (in the example it is the third partition). If necessary, it must be formatted.
If the computer is configured, use LINBO to create an image that you can roll out to other computers in the same group as usual.
Multiboot systems with UEFI
Several parallel operating systems are no problem for Linbo. It automatically creates and manages the necessary UEFI boat records.
LINBO boot media
When installing linuxmuster-linbo, an ISO file is created automatically under /var/linbo/linbo.iso, which can be used to create boot media. This is useful when certain hardware does not boot over the network. Then simply burn the file linbo.iso to a CD blank or copy it with a tool like for example ROSA ImageWriter on a USB stick. The boot media created in this way can be used universally, because it automatically detects which system (BIOS, UEFI, 64bit, 32bit, non-PAE) is started.
To set up a computer using the LINBO boot media, you boot it with the network cable connected. The LINBO start menu is slightly different depending on whether it is a BIOS or UEFI system:
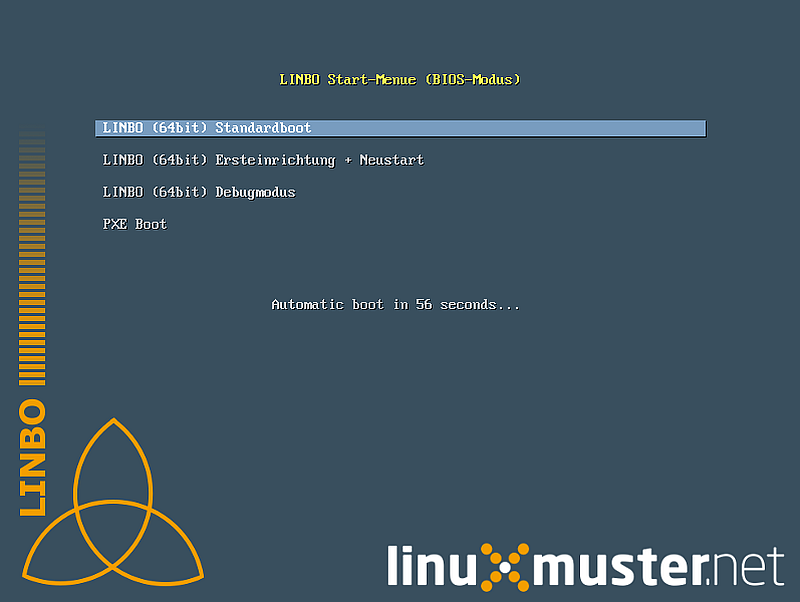
LINBO start menu in BIOS mode (using Syslinux), see Syslinux Menu-System

LINBO start menu in UEFI mode (using Grub), see Grub-Manual
The starting options in detail:
- Default boot
- Booting with the default parameters up to the client interface.
- First setup + restart
- The client disk is automatically partitioned and formatted according to the specifications of the start.conf file of the computer group downloaded from the server. The client then restarts. After this, the boot medium can be removed and you can continue with the locally installed LINBO cache.
- Debug Mode
- Boot in the text mode only to the console.
After a timeout of 10 seconds, the option //Default boot// is automatically activated.
The LINBO boot parameters can be adapted as required.
In BIOS mode, a line is displayed after pressing the [TAB] key, in which the start parameters can be edited. Once the necessary adjustments have been made, the [ENTER] button starts the boot process:
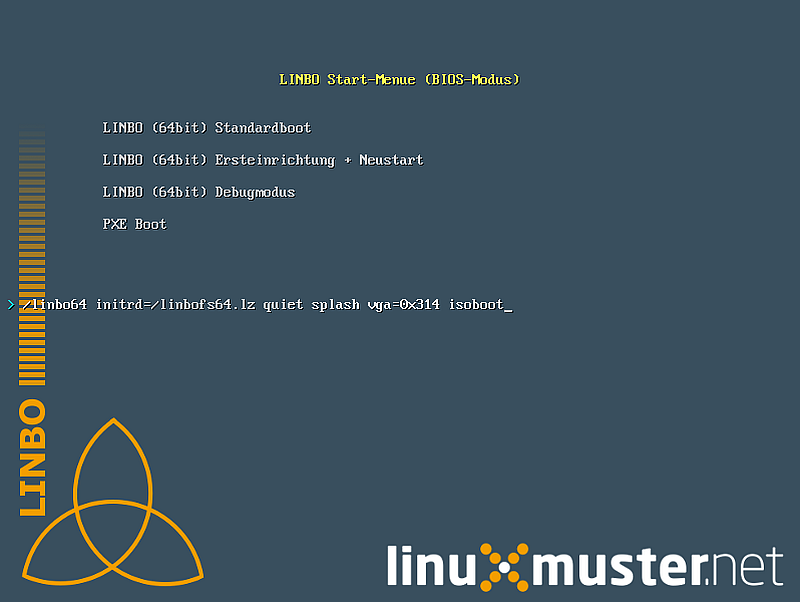
Edit the LINBO start menu in BIOS mode
In the UEFI mode, the corresponding boot menu entry can be edited by pressing the [E] button. Press [CTRL-X] or [F10] to start the boot process.

Edit LINBO start menu in UEFI mode
LINBO can set the system clock
Since LINBO version 2.3.13, LINBO is able to set the system time ( hwclock) and has integrated the ntpd program to query an NTP server. This means that you can use a postsync script to synchronize the current time with the IPFire and then set the hardware clock to this time.
echo -n "Setting date from: [$(date)] to ...wait for it... "
ntpd -nq -p 10.16.1.254
hwclock -u -w
echo -n "[$(date)]"
Synchronization takes about 6 seconds. The hardware clock is thus set to UTC, where upon Windows clients must be adapted, e.g. with
[HKEY_LOCAL_MACHINE\SYSTEM\CurrentControlSet\Control\TimeZoneInformation]
"RealTimeIsUniversal"=dword:00000001
Further information can be found here.