Installation and configuration of the server
Installing the Ubuntu Server
Connect the network card of the server to the switch to which the “green” network card of the IPFire is connected.
Note
Be sure to read the notes on the applicable versions in Preface and preparations and then install the firewall (Installation und Configuration of the Firewall).
Basic settings
Boot the server provided for linuxmuster.net from the Ubuntu server CD. Use the arrow keys to select the desired language and confirm with the ENTER key.
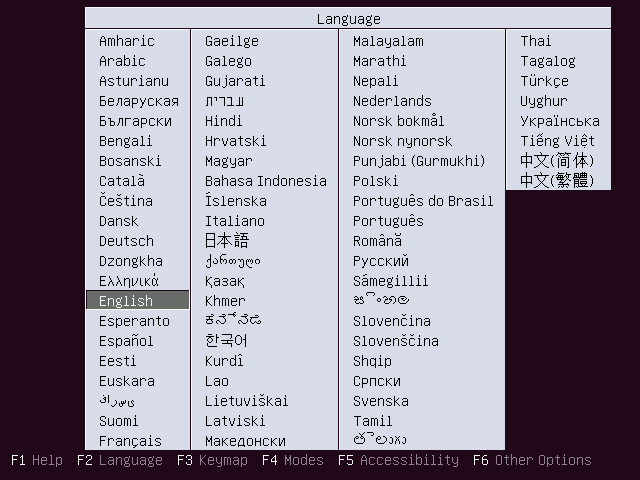
Select the desired language.
Confirm by pressing the ENTER button that you want to install Ubuntu.

Confirm that you want to install Ubuntu.
Confirm by pressing the ENTER key that the selected language pack might not be complete.
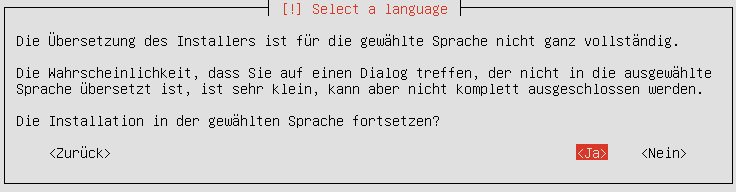
Confirm that the selected language pack may not be complete.
Use the arrow keys to select the location and confirm your selection by pressing the ENTER key.
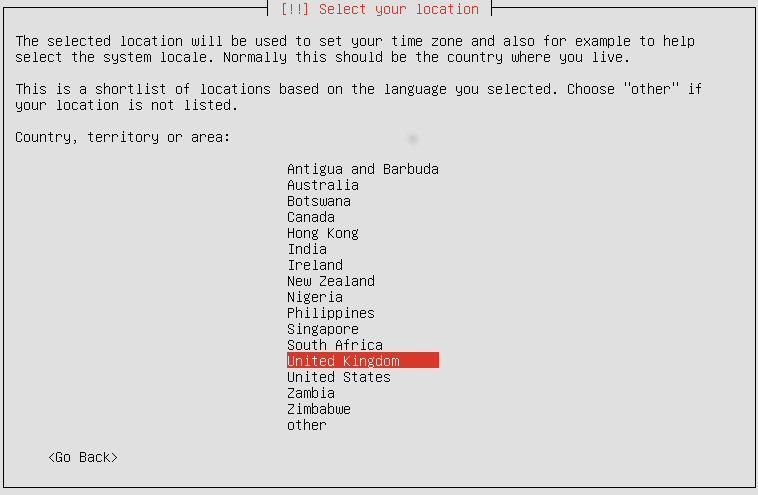
Specify the location.
Negate the automatic keyboard model detection.
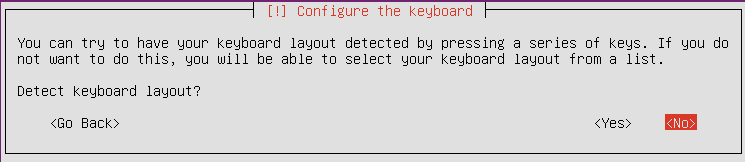
Negate the automatic keyboard model detection.
Select the country of origin of the keyboard layout.
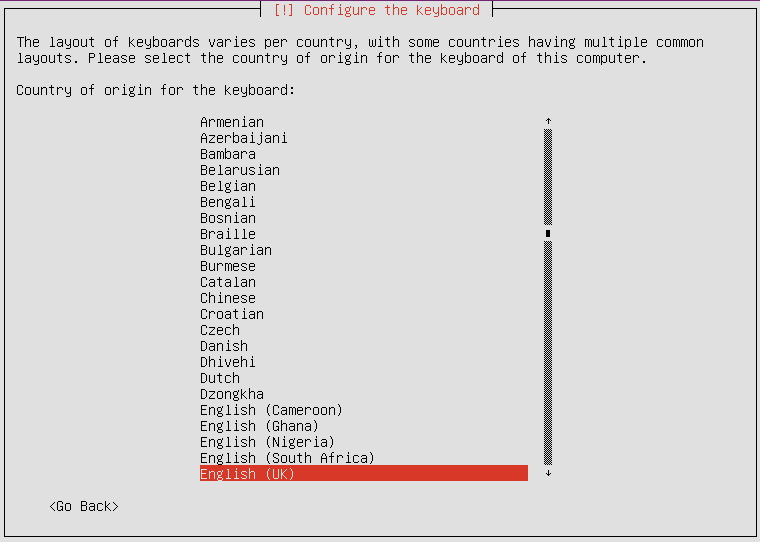
Select the country of origin of the keyboard layout.
Select the keyboard layout.
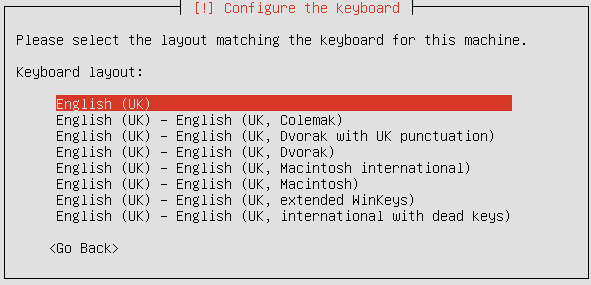
Select the keyboard layout.
Set up the network
Automatically obtaining an IP address fails first because there is no DHCP server.

Automatically obtaining an IP address will fail first.
You set up the network manually.
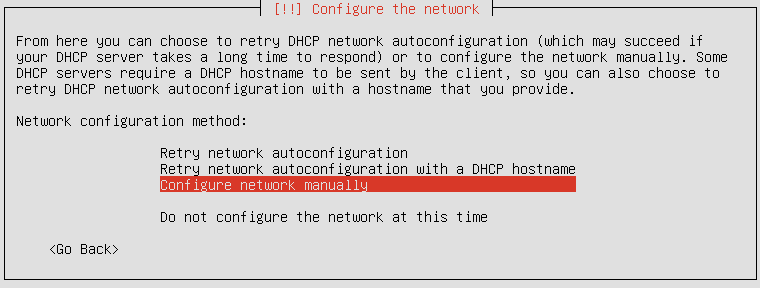
You set up the network manually.
Enter 10.16.1.1 as the IP address.
Note
If you have selected a different address range, you must adjust the following entry.
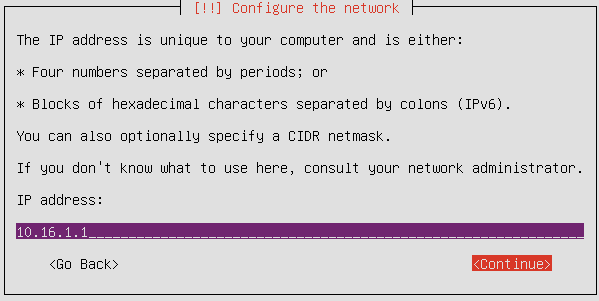
Enter 10.16.1.1 as the IP address.
Enter 255.240.0.0 as the netmask.
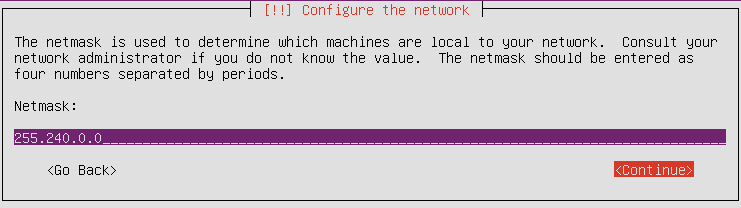
Enter 255.240.0.0 as the netmask.
Enter the gateway 10.16.1.254.
Note
If you have selected a different address range, you must adjust the following entry.
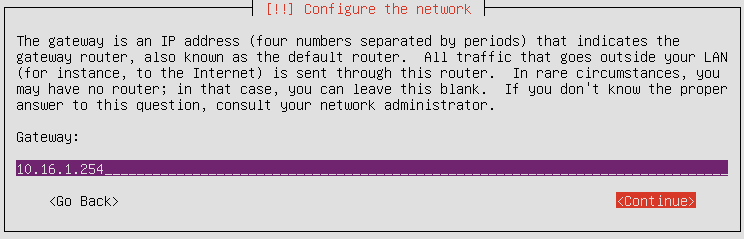
Enter the gateway 10.16.1.254.
Enter 10.16.1.254 as the DNS server.
Note
If you have selected a different address range, you must adjust the following entry.
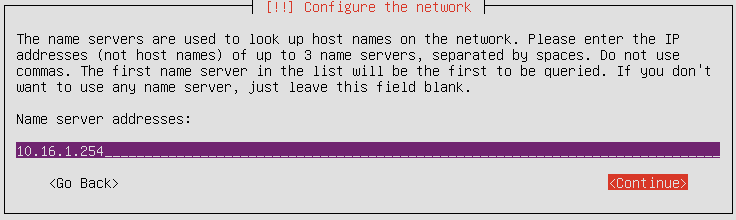
Enter 10.16.1.254 as the DNS server.
Enter the desired server name.
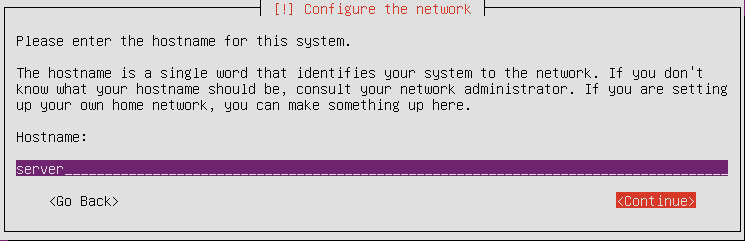
Enter the desired server name.
Enter the local domain that you have already selected when configuring the IPFire.

Enter local domain.
Set up the administrative user
Enter the desired user name.
Note
There are system-reserved names that can not be used, including admin.
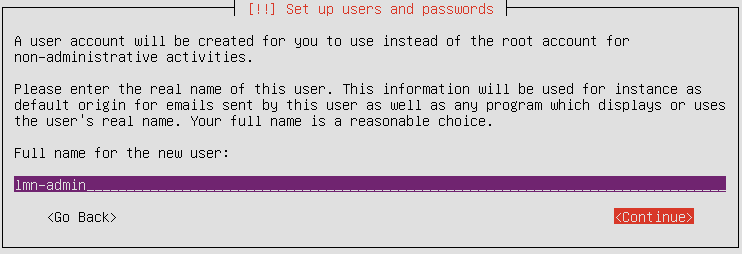
Enter the desired user name.
Enter the desired account for the user name.
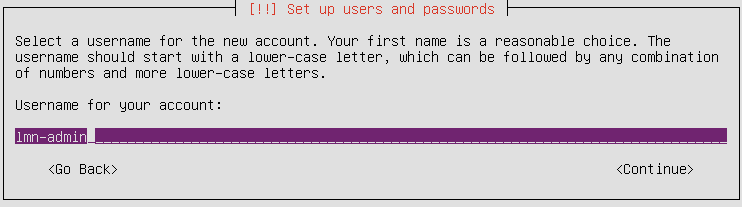
Enter the desired account for the user name.
Enter the desired password.
Note
If you are told that your password is weak, please choose a stronger one. The security of the system depends on the quality of the password!
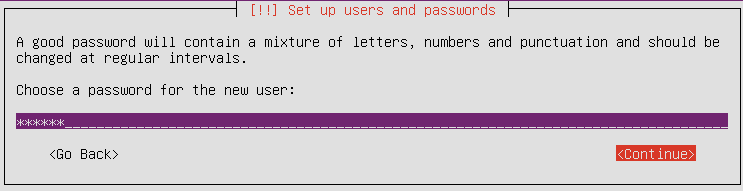
Enter the desired password.
Enter the password again.
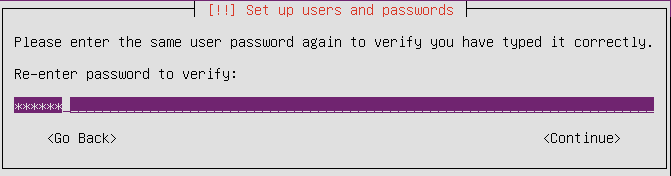
Enter the password again.
Do not encrypt your personal folder.
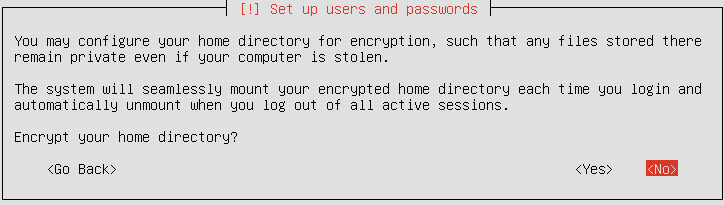
Do not encrypt your personal folder.
Confirm or, if necessary, correct the time zone.

Confirm or, if necessary, correct the time zone.
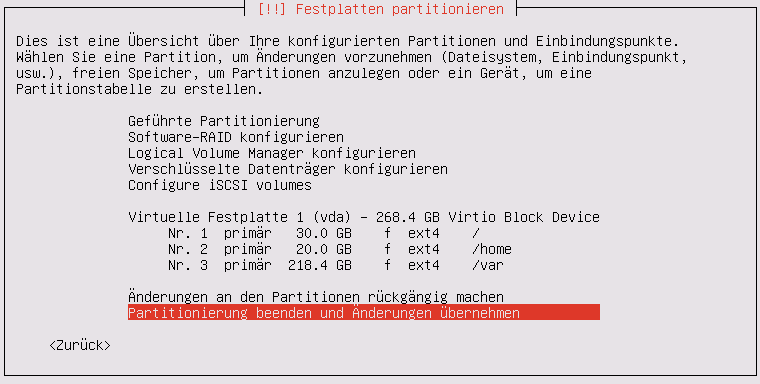
Partitioning
Partition it according to your needs. Here is only one linuxmuster.net specific specification:
Note
It is only necessary to ensure that the file systems under /home and /var are provided with the quota options usrquota and grpquota.
The following is an example of how to create three partitions (root, home and var partition) on a single hard drive.
As a rule, several hard disks are installed on one server. Please read the section Partitioning in expert mode to find out how such a system - even under optional use of the lvm and software- RAIDs is partitioned. There you will also find information on meaningful partition sizes.
At this point a swap partition is not used.
Partition manually.
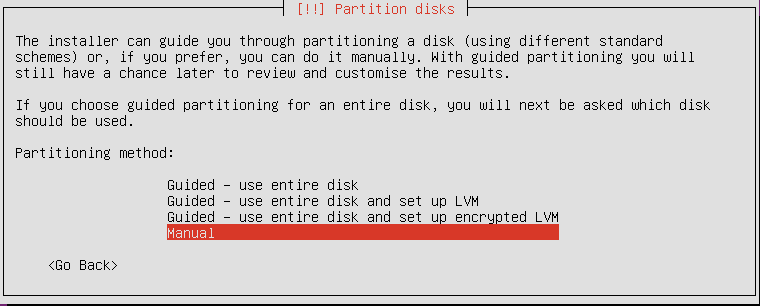
Partition manually.
Select the hard disk to partition.
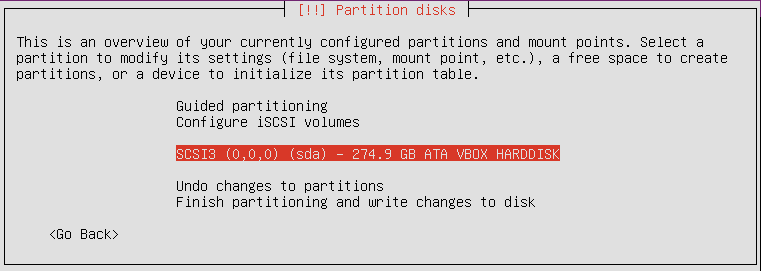
Select the hard disk to partition.
Confirm the creation of the partition table.
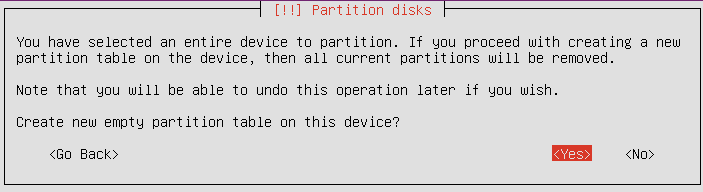
Confirm the creation of the partition table.
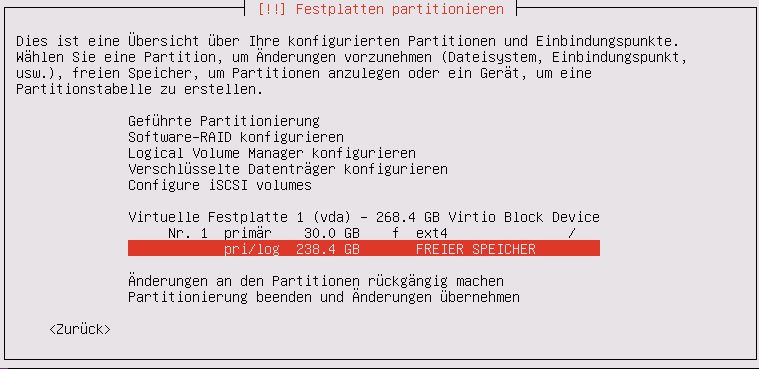
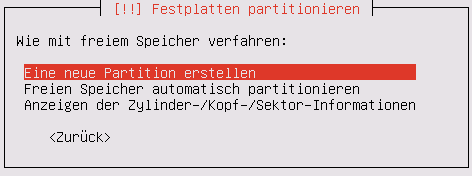
Select the free space to create the first partition.
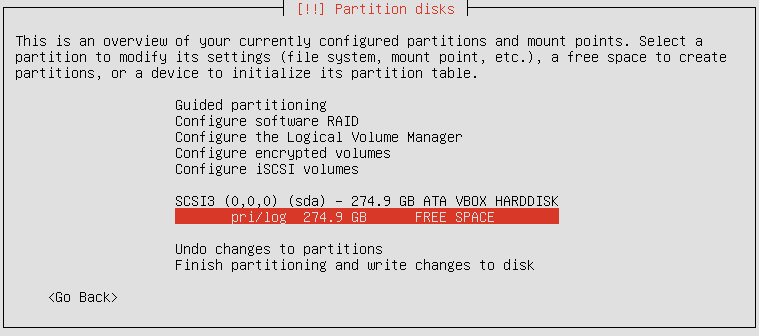
Select the free space to create the first partition.
Confirm the creation of the first partition.
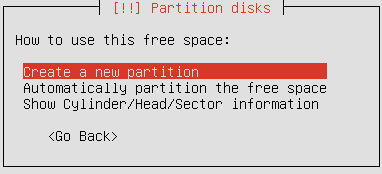
Confirm the creation of the first partition.
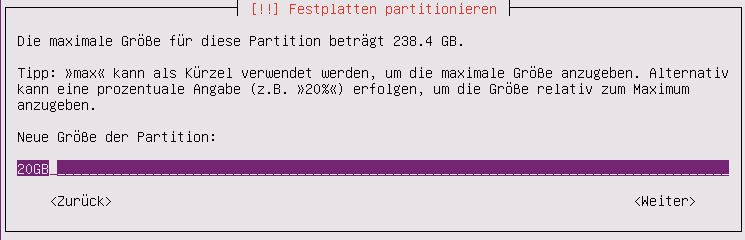
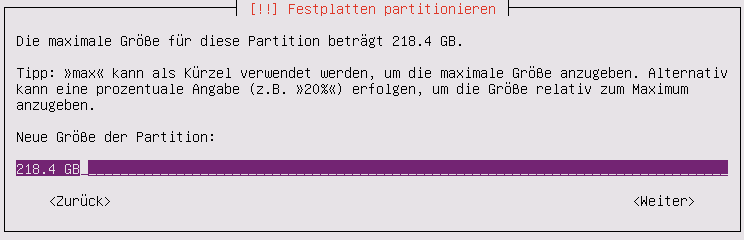
Select the size of the partition.
Note
The sizes of the partitions on the following screenshots come from a test system, to which other requirements are placed than a productive system. Read the section “Notes on the size of partitions” in the appendix to get a feeling for the necessary size of the partitions.
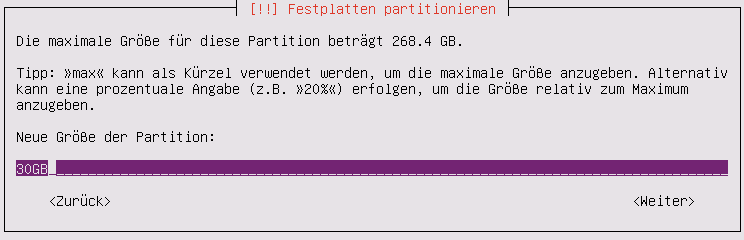
Select the size of the partition.
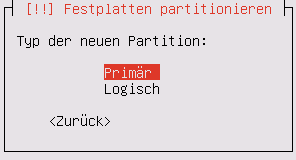
Select primary as the type of the partition.

Select primary as the type of the partition.
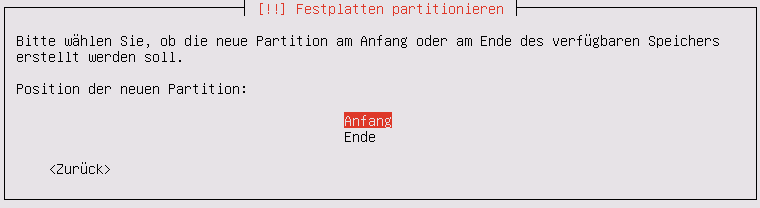
Confirm that the new partition is to be created at the beginning of free space.
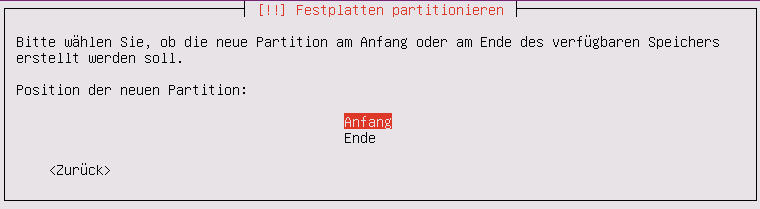
Confirm that the new partition is to be created at the beginning of free space.
Finally, confirm the creation of the partition. The root / was selected automatically as the mount point.
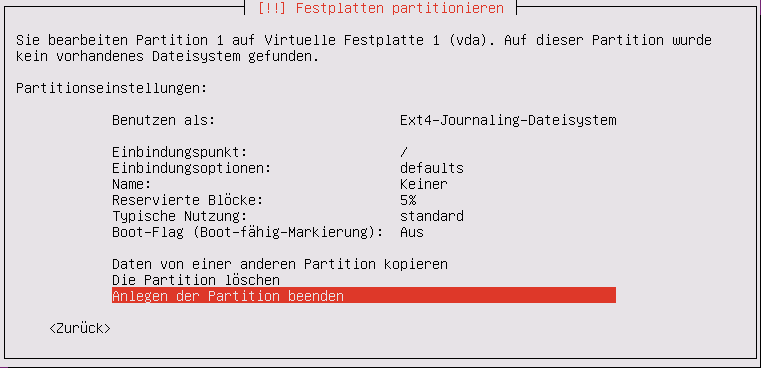
Finally, confirm the creation of the partition.
This is followed by the creation of the second partition on which the HOME directories of the users will be located. Select the free space to create the second partition.
Select the free space to create the second partition.
Confirm the creation of the second partition.

Confirm the creation of the second partition.
Select the size of the partition.
Select the size of the partition.
Select primary as the type of the partition.

Select primary as the type of the partition.
Confirm that the new partition is to be created at the beginning of free space.
Confirm that the new partition is to be created at the beginning of free space.
/home is automatically selected as the mount point. Now the mount options have to be adapted.
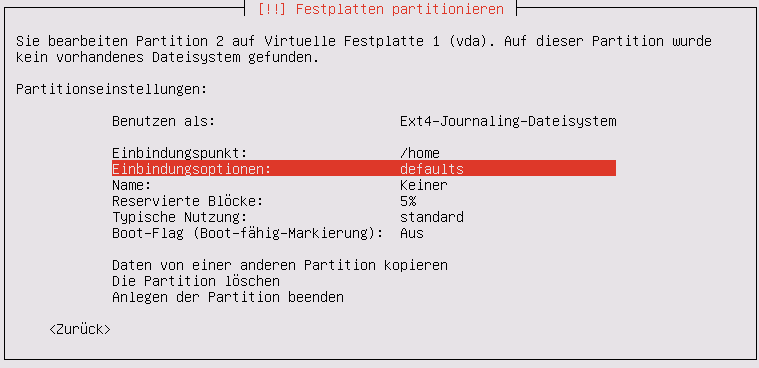
Select the mount options item.
Select the mount options usrquota and grpquota with the Spacebar.
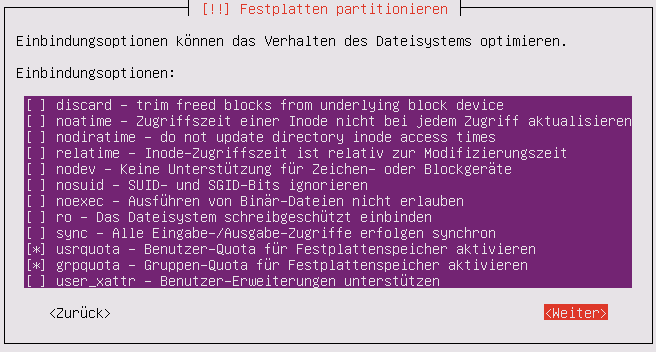
Choose the option usrquota and grpquota.
Finally, confirm the creation of the partition.
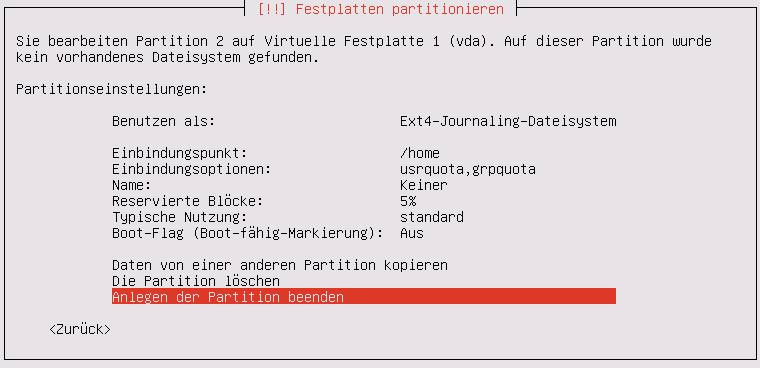
Finally, confirm the creation of the partition.
This is followed by the creation of the third partition on which the images of the clients will be located. Select the free space to create the third partition.
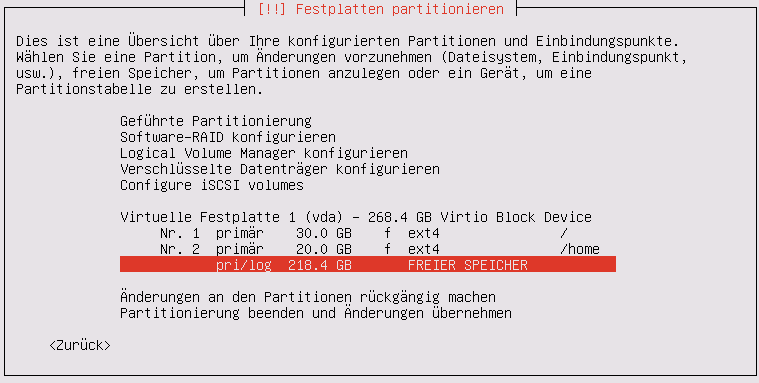
Select the free space to create the third partition.
Confirm the creation of the third partition.
Confirm the creation of the third partition.
Select the size of the partition.
Select the size of the partition.
Select primary as the type of the partition.
Select primary as the type of the partition.
Select the mount point /var manually.

Select the mount point.
Select /var with the Spacebar.
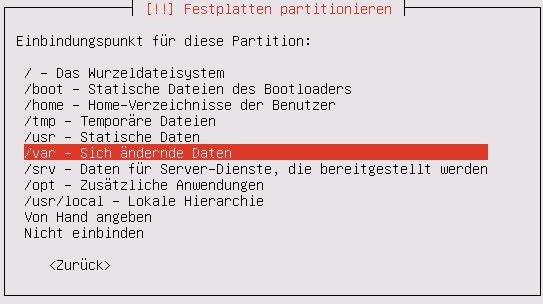
Select /var with the Spacebar.
The mount options are now selected.
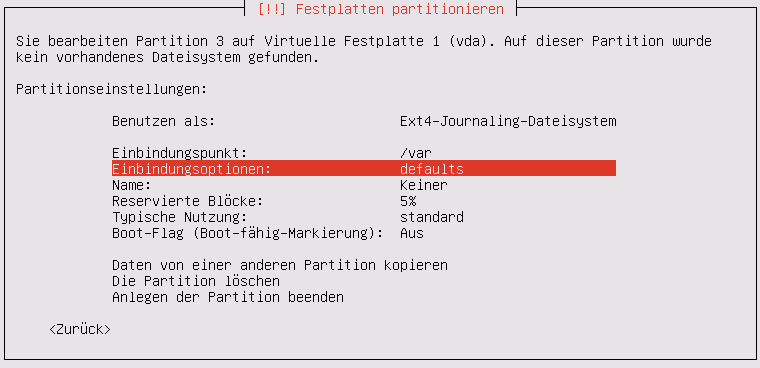
Select the mount options item.
Select the mount options usrquota and grpquota with the Spacebar.

Choose the option usrquota and grpquota.
Finally, confirm the creation of the partition.
Finally, confirm the creation of the partition.
The system indicates that no SWAP storage was created. Answer the question whether this should be done.
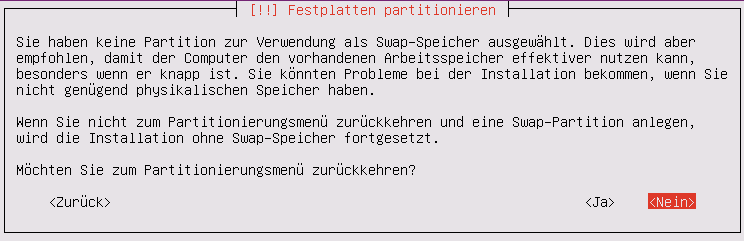
Answer the question whether a SWAP part is still being created.
Confirm that the prepared changes to the partition are actually written to the disk.
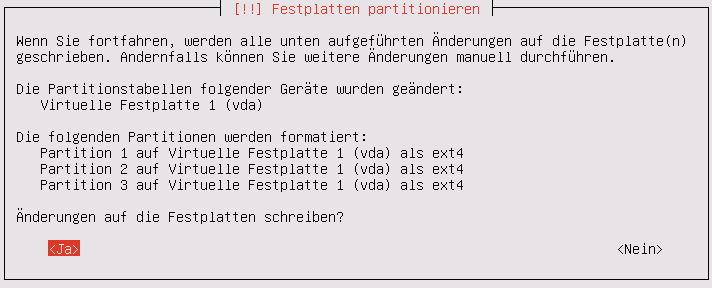
Confirm the writing of the changes to the partitions.
The server is not connected via a proxy, continue with “Next”.
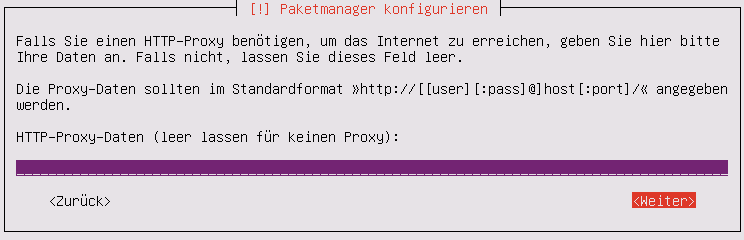
The server is not connected via a proxy, continue with “Next”.
It is strongly advised not to import updates automatically. As an administrator, you should always know when something in the system changes, e.g. to create a backup first.
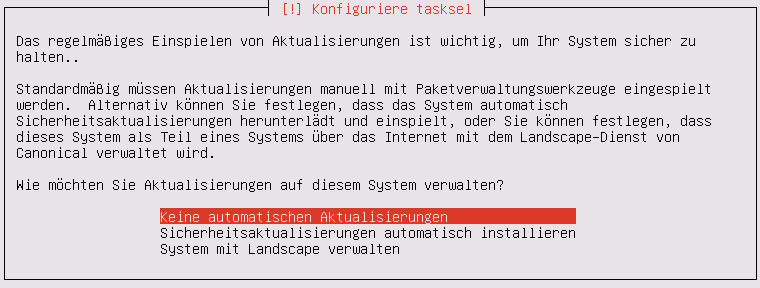
Select “No automatic updates”.
Note
This does not mean that you should not update the system, but not automatically. Please read Keep Linuxmuster.net up-to-date
Do not select any software to install. All required packages are installed later by a script, Also an OpenSSH server.
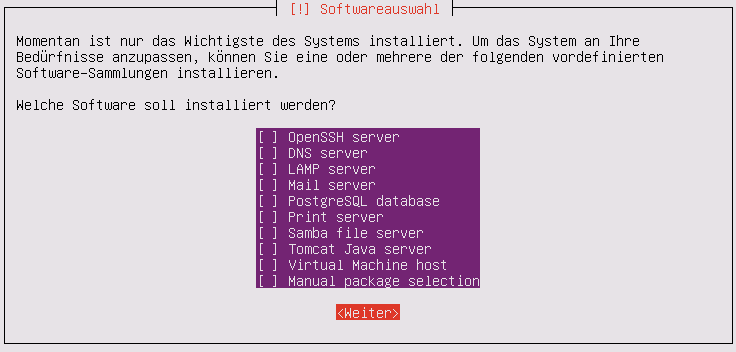
If no software is selected, continue with “Next”.
Confirm that the bootloader is to be installed in the master boot record.
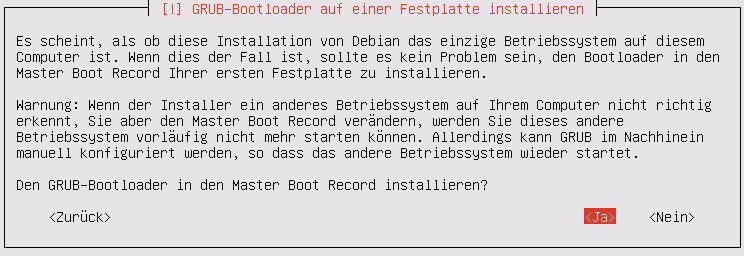
Confirm that the bootloader is to be installed in the master boot record.
The system is rebooted to complete the installation.
The system is rebooted to complete the installation.
After Reboot
After rebooting, log it in with your user and password selected during installation.
linuxmuster.net 6.2.0 / Codename Babo
server login:lmn-admin
Passwort:
Nach dem Login werden sie möglicherweise darauf hingewiesen, dass ein „neues Release 14.04.4 LTS“ zur Verfügung stehe. Führen Sie den Vorschlag „do-release-upgrade“ keinesfalls durch.
Alle andere Updates sollten wie im Folgenden gezeigt eingespielt werden. Zunächst verleihen Sie sich dauerhaft root-Rechte.
lmn-admin@server:~$ sudo -i
Password:
server ~ #
Note
In der Dokumentation wird die Konsoleneingabe mit ‘’root@server <verzeichnis> #’’ gekennzeichnet, sobald man root-Rechte hat, auch wenn auf Ihrem Server eventuell nur ‘’server <verzeichnis> #’’ erscheint. Ansonsten bezeichnet ‘’lmn-admin@server:<verzeichnis>$’’ dass man als lokaler Benutzer arbeitet.
Nun holen Sie die aktuellen Paketlisten, zuvor müssen die Domänen getauscht werden.
root@server ~ # sed -i 's/de.archive.ubuntu.com/archive.ubuntu.com/g' /etc/apt/sources.list
root@server ~ # rm -rf /var/lib/apt/lists/*
root@server ~ # apt-get clean
root@server ~ # apt-get update
Now install all the updates.
root@server ~ # apt-get dist-upgrade
Then restart the server
root@server ~ # reboot
Also check whether the language pack has been installed for the language selected during the installation. e.g. For “German” with
lmn-admin@server:~$ dpkg -l | grep language-pack-de
The following edition is expected: version numbers may vary.
ii  language-pack-de         1:12.04+20120618      translation updates for language German
ii  language-pack-de-base    1:12.04+20120508      translations for language German
If necessary, install the missing German language support:
lmn-admin@server:~$ sudo apt-get install language-pack-de
Set up the linuxmuster.net packages
This tutorial describes how the Ubuntu server becomes a linuxmuster.net server.
First, give yourself root privileges.
lmn-admin@server:~$ sudo -i
Preparations
Use a editor (e.g. vi or nano) to generate the file /etc/apt/sources.list.d/linuxmuster-net.list with the following content:
deb http://pkg.linuxmuster.net/ babo/
deb-src http://pkg.linuxmuster.net/ babo/

deb http://pkg.linuxmuster.net/ babo62/
deb-src http://pkg.linuxmuster.net/ babo62/
For the system to rely on the linuxmuster.net source, the linuxmuster.net key must still be installed. First, download the key.
root@server ~ # wget http://pkg.linuxmuster.net/linuxmuster.net.key
Import the key into your system
root@server ~ # apt-key add linuxmuster.net.key
Delete the key file that is not required any more.
root@server ~ # rm linuxmuster.net.key
Update the package lists.
root@server ~ # apt-get update
Install the linuxmuster-base package.
root@server ~ # apt-get install linuxmuster-base
Note
If the installation of linuxmuster-base fails because packages have unresolved dependencies, proceed as follows:
Remove all package lists from the system
root@server ~ # rm -rf /var/lib/apt/lists/*
Remove all packages from the cache
root@server ~ # apt-get clean
Update the package lists
root@server ~ # apt-get update
Now install all the updates.
root@server ~ # apt-get dist-upgrade
You may get a question about postfix-configuration. Select “No configuration”.
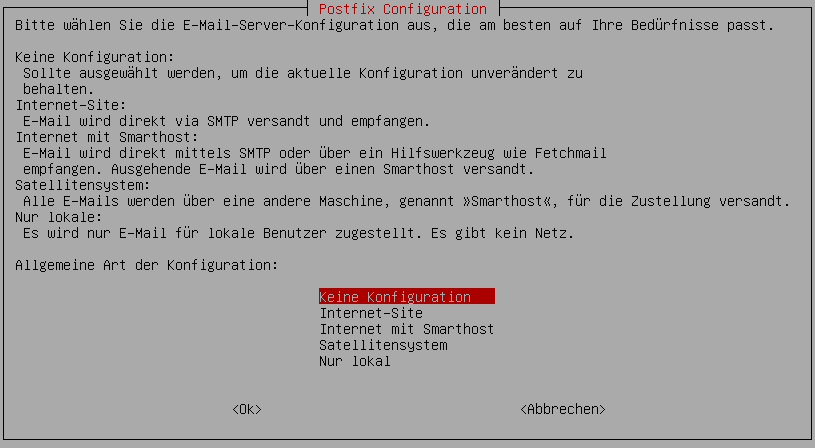
Select “No Configuration”
Setup
Now start the setup script for initial setup of the system:
root@server ~ # linuxmuster-setup --first
Subsequently, software packages required for the server setup are downloaded and installed. Depending on the Internet connection and the hardware used, this can take a few minutes.
If all packages are installed, the configuration values are queried. If you make any errors during the configuration dialog, you can continue with the configuration and abort the configuration in the last dialog, in the network card menu.
Confirm the notes.
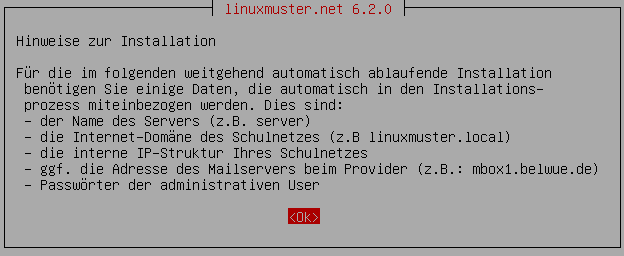
Confirm the notes.
Enter the international country code. Two upper-case letters are allowed; “DE”.
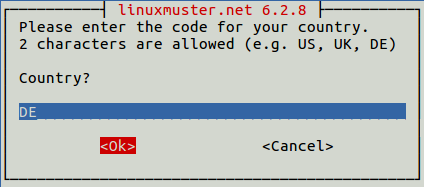
Enter the international country code.
Enter the short name of the state.
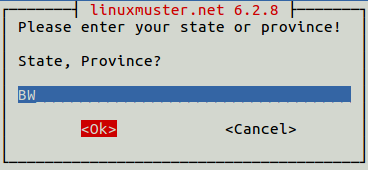
Enter the short name of the state.
Enter the city name of your school.
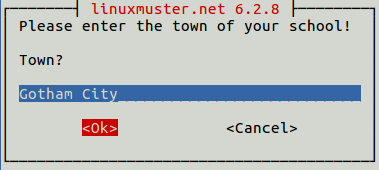
Enter the city name of your school.
Enter the school name, if the school location is part of the school name, leave it here. There are no spaces allowed.
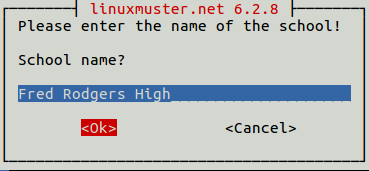
Enter the name.
Enter the name of the Samba domain, letters are allowed.
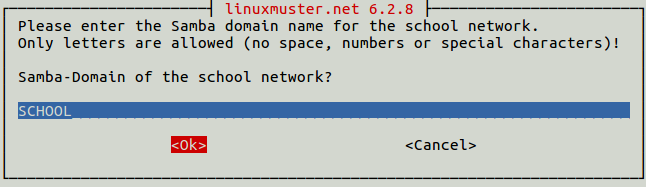
Enter the name of the Samba domain.
Enter the hostname of the server, only letters, digits and the minus sign are allowed.
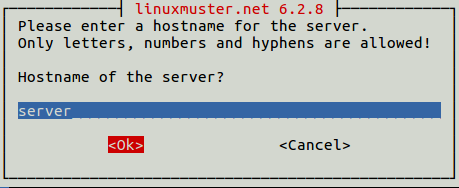
Enter the hostname of the server.
Enter the Internet domain name, which can only consist of letters, digits, minus signs, and dots.
Note
If you want external access to your server via a dynamic DNS address, you can spare some manual reconfiguration if you also use the dynamic domain name for the intranet.

Enter the Internet domain name.
Select the IP range for the internal network. Use the arrow keys to navigate the list. Confirm your selection with the ENTER key.
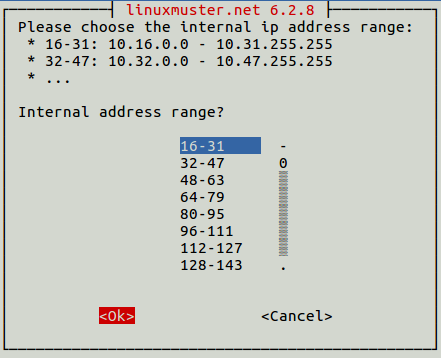
Select the IP range for the internal network.
Enter the external server name if the server is accessible from outside under a different name. This name is used for the OpenVPN configuration on the firewall.
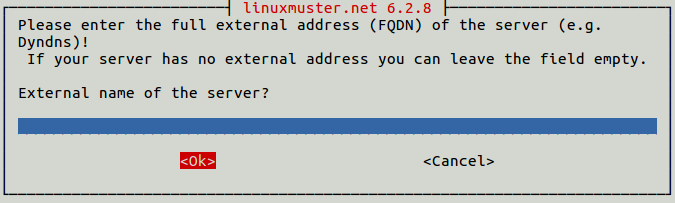
Enter the external server name.
Confirm to use IPFire as a firewall. In principle, you can use any firewall (custom), but with limited functionality [1].
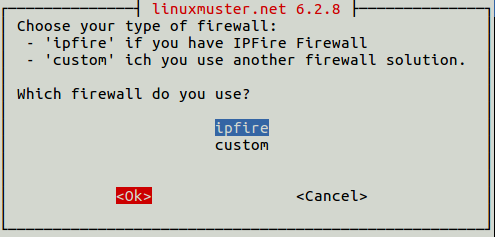
Select the firewall solution.
If the server should send e-mails over the Internet, enter the Internet address of the e-mail server of your provider. If not, leave the field empty.
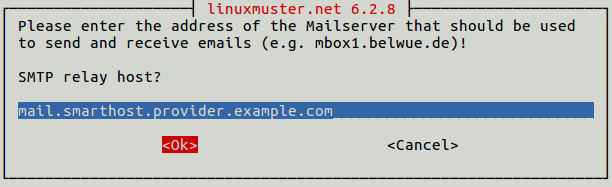
Enter the Internet address of the e-mail server of your provider.
Decide whether you want to use subnets or not. If you do not know what subnets are, select “no”.
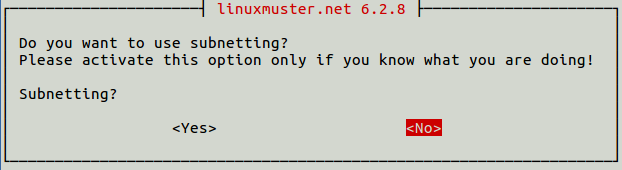
Decide whether you want to use subnets or not.
Select a password for the administrator user.
Note
Small and uppercase letters are accepted. Special characters are only allowed in part, the following characters are not allowed:
äöüß$&{}![]+#
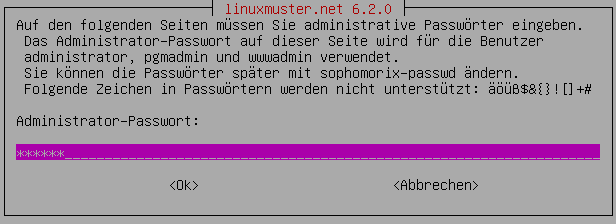
Select a password for the administrator user.
Re-enter the password.
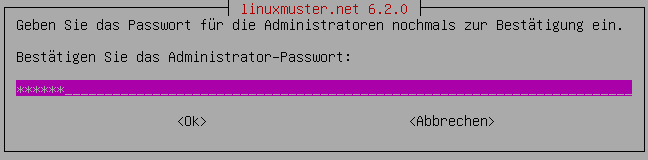
Enter the password for the administrator again.
Enter the password of the user root on the IPFire you entered when you installed the IPFire.
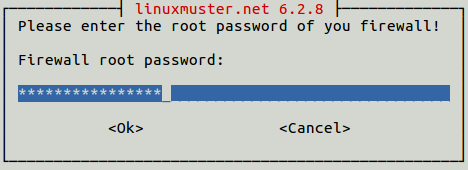
Enter the password for the root user on the IPFire.
Re-enter the password.
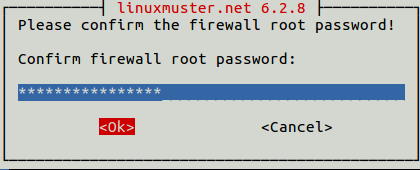
Enter the password again for the user root on the IPFire.
Select the network card that is connected to the green network. By pressing the OK button, the configuration is created.
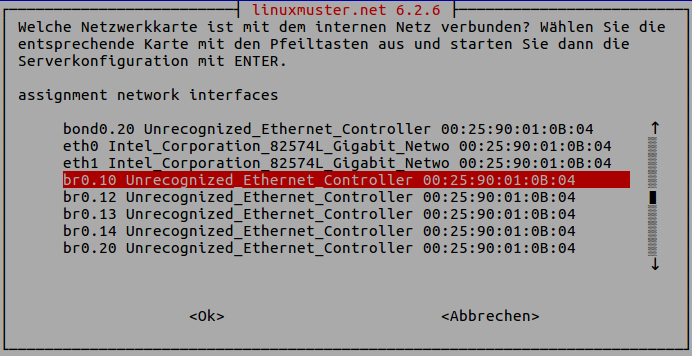
Select the network card that is connected to the green network.
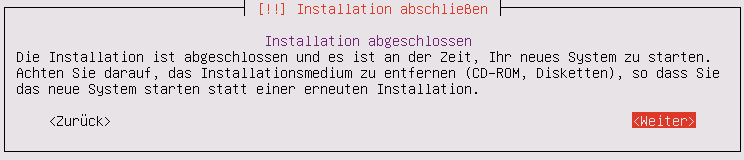
The installation is now completed. Restart the server.
root@server ~ # reboot
After restarting, you are welcomed by the login prompt of linuxmuster.net 6.2.0 / Codename Babo.
Next, you can include workstations, especially the “default Linuxclient” is very interesting. This is a fully installed and configured LTS Ubuntu, which you can integrate into the system within minutes. Alternatively, you can also install a Windows 10.
| [1] | If you use your own firewall solution, neither Internet lock nor web filter will work. Furthermore the firewall in their internal network (with the IPFire “green network”) has to have the IP 10.16.1.254 and the netmask 255.240.0.0, otherwise neither server nor clients have Internet access. |