How do I set up printers on the clients?
On the client side, printers must be set up using the HTTP protocol so that the room-related printer access control can work through the school console. The URL for the printer connection is composed as follows:
http://<servername>:631/printers/<printername>
PDF printer
For example, the default PDF printer is accessible via the URL
http://server:631/printers/PDF-Printer
For the PDF printer to be used on the client, a standard PostScript printer must be set up on the client.
Linux Clients
Printer installation at the clients is done via an universal postsync-script. The only requirement is, that the printers were already setup at the server and that you use preconfigured images (cloop) as linux client. These are available for Ubuntu 14.04 (trusty) and Ubuntu 16.04 (xenial).
The following file then exists on the server in one of the directories:
/var/linbo/linuxmuster-client/trusty/common/etc/hosts
/var/linbo/linuxmuster-client/xenial/common/etc/hosts
This file has the following rights:
-rw-r--r-- 1 root root 459 Jul 18 2014 hosts
This hosts file contains the following content, which is then adapted to the computer using the Postsync script:
# This file is patched by postsync. It is to be processed on the server.
# Path: /var/linbo/linuxmuster-client/xenial/common/etc/hosts
HOSTNAME is patched in the post sync script with the real name
127.0.0.1 HOSTNAME
The next line contains the host names as they are entered on the server...
#SERVERIP server.linuxmuster.lokal server
# For CUPS to be satisfied, you need to add this line here:
#SERVERIP server.local server.lokal
The Postsync script is located in the directory:
/var/linbo/<LinuxImagename>.cloop.postsync
It has the following rights of access:
-rw-rw---- 1 root root
In the postsync-script there are records as follows (here for Trusty-Cloop):
echo "##### trusty-linuxmuster POSTSYNC BEGIN #####"

# IP-Adresse des Server
SERVERIP=10.16.1.1
STARTCONF=/cache/start.conf

# Raum feststellen. Dieses Skript geht davon aus
# dass die Rechner Namen der Form
# raumname-hostname haben, also z.B. cr01-pc18
RAUM=${HOSTNAME%-*}
# wenn der string leer ist, raum auf unknown setzen
if [ "x${RAUM}" == "x" ]; then
    RAUM="unknown"
fi

# Das Verzeichnis, in dem die Serverpatches
# local synchronisiert werden.
PATCHCACHE=/linuxmuster-client/serverpatches
# UVZ auf dem Server. Mit diesem Variablen kann
# man verschiedene Images bedienen (was bei linux
# selten nötig ist)
PATCHCLASS="trusty"

echo ""
echo "Hostname:      ${HOSTNAME}"
echo "Raum:          ${RAUM}"
echo "Patchcache:    ${PATCHCACHE}"
echo "Patchclass:    ${PATCHCLASS}"
echo ""
if [ ! -d /cache/${PATCHCACHE}/${PATCHCLASS} ]; then
  echo "Patchklasse ist nicht vorhanden."
  echo "Auf dem Server mit mkdir -p /var/linbo/linuxmuster-client/${PATCHCLASS}/common/ das Grundverzeichnis anlegen und dort die gepatchten Dateien ablegen."
fi

# -----------------------------------------
# Patchdateien auf das lokale Image rsyncen
# -----------------------------------------
echo " - getting patchfiles"

# RAUM     -> Raumname
# HOSTNAME -> Rechnername
# Verzeichnis anlegen, damit es sicher existiert
mkdir -p /cache/${PATCHCACHE}
rsync --progress -r "${SERVERIP}::linbo/linuxmuster-client/${PATCHCLASS}" "/cache/${PATCHCACHE}"

echo " - patching local files"
# zuerst alles in common
if [ -d /cache/${PATCHCACHE}/${PATCHCLASS}/common ]; then
    cp -ar /cache/${PATCHCACHE}/${PATCHCLASS}/common/* /mnt/
fi

# dann raumspezifisch
if [ -d /cache/${PATCHCACHE}/${PATCHCLASS}/${RAUM} ]; then
    cp -ar /cache/${PATCHCACHE}/${PATCHCLASS}/${RAUM}/* /mnt/
fi

# dann rechnerspezifisch
if [ -d /cache/${PATCHCACHE}/${PATCHCLASS}/${HOSTNAME} ]; then
    cp -ar /cache/${PATCHCACHE}/${PATCHCLASS}/${HOSTNAME}/* /mnt/
fi

# -----------------------------------
# Berechtigungen anpassen, wenn nötig
# -----------------------------------
echo " - setting permissions of patched local files"

# printers.conf
#[ -f /mnt/etc/cups/printers.conf ] && chmod 600 /mnt/etc/cups/printers.conf

# .ssh verzeichnis
#chmod 700 /mnt/root/.ssh/
#chmod 600 /mnt/root/.ssh/authorized_keys

# hostname in /etc/hosts patchen
sed -i "s/HOSTNAME/$HOSTNAME/g" /mnt/etc/hosts
sed -i "s/#SERVERIP/$SERVERIP/g" /mnt/etc/hosts

# fstab anpassen, damit Swap-Partition stimmt
echo "---- hier beginnen wir mit dem debuggen:"
SWAPZEILENNR=$(grep -i "^fstype" $STARTCONF | cut -d"#" -f1 | grep -n -i "swap" | cut -d":" -f1)
echo Swapzeilennummer: $SWAPZEILENNR
SWAP=$(grep -i "^dev" -m $SWAPZEILENNR $STARTCONF | tail -n1 | cut -d"=" -f2 | tr -d [:blank:]|head -c9)
echo Swap: $SWAP
sed -i "s|#dummyswap|$SWAP|g" /mnt/etc/fstab

echo "##### trusty-linuxmuster POSTSYNC END #####"
Note
Note for linuxmuster.net version 6.2
If, when using the Postsync script on the client, a printer cannot be reached although it has been set up on the server, all so-called CUPS-browsed entries should still be removed on the server’s CUPS service and all browse poll entries for the client’s CUPS service. This is because an older CUPS version is installed on the server than on the clients whose CUPS version is more current as of Ubuntu 14.04.
The entries are to be removed as follows:
Server cups: File /etc/cups/cupsd.conf - comment out all entries with cups-browsed Client cups: File /etc/cups/cupsd.conf - comment out all entries with BrowsePoll
Alternatively: manual printer setup
The printer installation on the Linux client can be done using the CUPS web interface (like on the server). Log on to the CUPS administration page as the local user administrator on the client using a browser and the URL http://localhost:631/admin.
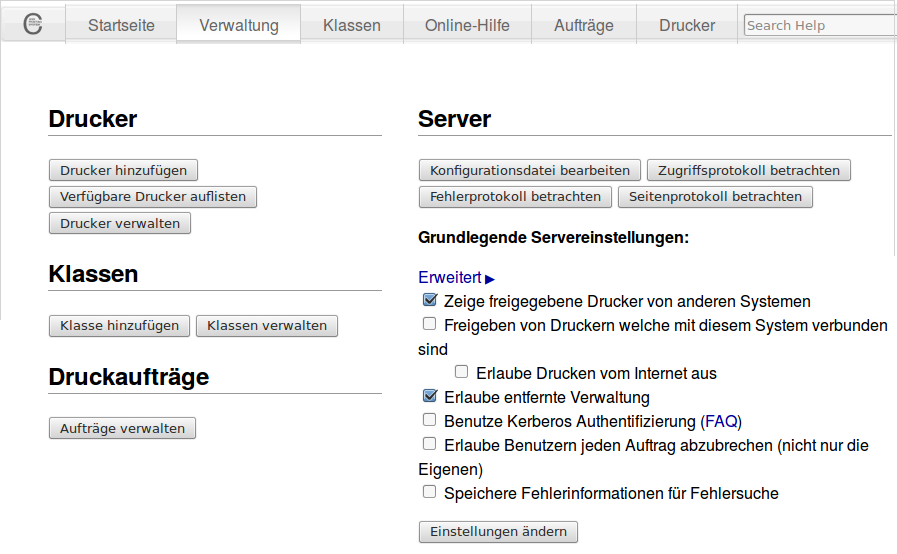
Click Add Printer under the heading “Printers”.
At the next step as network printer choose Internet Printing Protocol (https).
In the next step, select the correct address. If the network printer is controlled via the linuxmuster.net server, its addresses must be specified:
**https://10.16.1.1/printers<printername>**
Then select the correct printer model for the printer to be set up.
Finally, select the appropriate printer model, or select your own PPD file to be installed on the client.
The other setup steps correspond to those already executed on the server.
Windows Clients
Melden Sie sich lokal am Windows-Client als administrator an und rufen Sie den Druckerinstallations-Assistenten auf, oder starten Sie den Druckerinstallations-Assistenten als Benutzer administrator. Den Druckerinstallations-Assistenten rufen Sie wie folgt auf: ** Systemsteuerung –> Hardware und Sound –> Geräte und Drucker –> Drucker**
In the Add Printer dialog, select Add a network, wireless or Bluetooth printer.

In the following dialog box, close the printer search and go to the next screen via the button “The desired printer is not listed”.

Select the option Shared printer and write the printer URL according to the specification in the printer setup section in the input field (example http://server:631/printers/networkprinter).
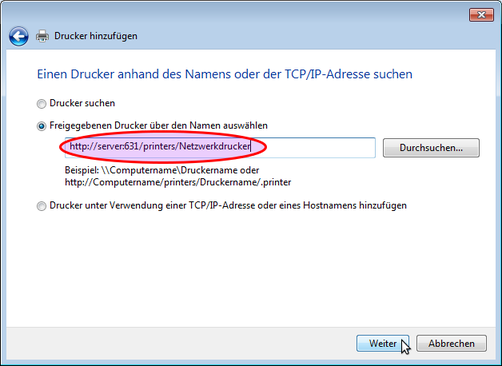
After the driver installation has been completed, the printer is available in our example as a network printer on http://server:631.
Example: PDF printer
A PostScript printer must be set up to use the PDF printer. Start the installation of a network printer via the printer installation wizard and enter the URL of the PDF printer as a network path (see How do I add printers?). In the further course of the installation dialog, select the MS Publisher Color Printer printer model, which is listed under Generic manufacturer:
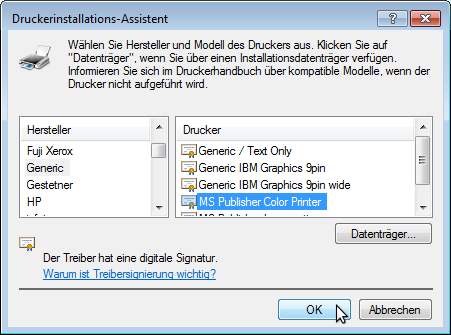
After the printer installation is completed, the PDF printer is available as a PDF printer at http://server:631.